|
Morse Micro IoT SDK
2.9.7
|
|
Morse Micro IoT SDK
2.9.7
|
This getting started guide walks through the process of using the MM-IoT-SDK Framework. This will go through the process of setting up the software infrastructure, building firmware for the EKH08, and loading it onto the device.
Note that the MM-IoT-SDK Framework is meant for more advanced users. For a simpler experience it is suggested to use PlatformIO. See
MM USERGUIDE - Platform IOfor details.
The first step is to create an appropriate directory and unzip the software package into it. For example:
unzip mm-iot-sdk-<VER>.zip -d mm-iot-sdk-<VER>
cd mm-iot-sdk-<VER>/framework
Where <VER>= is the package version number. The instructions below assume that the current working directory is mm-iot-sdk-<VER>/framework.
-d parameter when unzipping or unzip into an empty directory.The following is a brief overview of the contents of the MM-IoT-SDK package as it relates to using the framework. There are additional files that are used for PlatformIO that we will be ignoring.
| Path | Description |
|---|---|
framework/doc/ | HTML documentation, including Getting Started Guide and API documentation |
framework/mk/ | Makefile fragments for the various SDK components |
framework/morsefirmware/ | Firmware and board configuration files for supported Morse Micro chips and modules |
framework/morselib/ | Headers and .a files for morselib. Libraries can be found under morselib/lib/<architecture> |
framework/src/freertos/ | FreeRTOS source code |
framework/src/hostap/ | WPA Supplicant source code |
framework/src/lwip/ | Lightweight IP source code |
framework/src/platforms/ | Platform-specific code. Includes relevant MCU BSP code, Hardware Abstraction Layer shims, Operating System abstraction layer shim. |
framework/tools/ | Various host tools |
examples/ | Example applications in source form. Note not all platforms support all examples due to memory constraints |
Provided in the SDK package is a script to install the prerequisite software on a Ubuntu 22.04 PC. This may work with other Ubuntu/Debian distributions but your mileage may vary.
The script can be run as follows:
./tools/setupscripts/ubuntu-setup.sh
This script installs some packages in /opt/morse. If you have already connected the development board, unplug the USB cable for 5 seconds and plug it in again after running the script. This will cause the new device permissions to take effect.
A shell script is provided that adds the necessary directories to the PATH. This can be sourced as follows:
. ./tools/setupscripts/env.sh
The above script needs to be run for every terminal instance. For a more permanent solution, you can add this to the initialization script for your shell, in which case it will not need to be run manually. For example, if you are using the default shell (bash) on Ubuntu 22.04, you can add a line like the following to the file .bashrc in your home directory. Note that you will need to substitute $HOME/mm-iot-sdk-<VER> with the appropriate name of the directory where you unpacked the SDK package.
. $HOME/mm-iot-sdk-<VER>/framework/tools/setupscripts/env.sh
After making the above change to .bashrc you will need to close and reopen your terminal for this to take effect.
All the python scripts in the Morse Micro IoT SDK have been validated with Python3.10 (default for Ubuntu 22.04). Your mileage may vary if you use a different version.
As part of the SDK there are a number of python scripts used as tools (Setting Application Configuration) or to drive example applications (How to use the Emmet example application). In order to maximise the chances of these scripts working seamlessly on your machine we utilise a tool called Pipenv. It is a tool used to automatically create and manage a virtualenv. The virtualenv used for the SDK is define by the Pipfile located in the root of the mm-iot-sdk-<VER> directory. Pipenv is installed in the Ubuntu setup script in Development PC setup.
To create the virtual env run:
pipenv sync
You can run python scripts from the virtualenv in two ways:
pipenv shell. This will drop you into a shell in the virtual env from which you can run your python scripts as normal.pipenv run ./tools/your-script.py . This will run the script in the virtual env and then exit.The
pipenvcommands must be run from the same directory as the Pipfile that defines the virtualenv. If you do not do this a new virtualenv will be defined without the required packages.
This version of the IoT SDK has been tested against Morse Micro AP with software version 1.13.1. It is assumed that you have this configured and within range of your Morse Micro IoT Reference Platforms.
This SDK includes several example applications, source code for which can be found in the mm-iot-sdk-<VER>/examples/<example> directory. For more detail about each of the example applications see the Example Applications page.
In the following sections we will be going over some of the common elements that you will see in most, if not all, example applications. We will be using the ping application as an example.
This is a brief overview of the ping example application structure, it is not a substitute for reading the source code.
Below is a quick overview of some key files in the example application directory.
| File | Description |
|---|---|
src/ping.c | This is the main entry point for the application code and contains the core ping logic |
src/mm_app_common.c | This is a common module used by a number of example apps for initializing the network interface |
config.hjson | Configuration file used for populating the Morse Micro Persistent Configuration Store module |
targets/<platform>/Makefile | Makefile to build the example application for the supported platforms |
There are a number of configuration parameters that can be used to change how the applications operate. Note these are not all the possible parameters just the key ones for the ping application, see mm-iot-sdk-<VER>/examples/<application>/config.hjson for the full list.
| Configuration Params | Description |
|---|---|
wlan.country_code | Two character country code. For an up-to-date list of supported country codes in the supplied regulatory database, see the reference implementation mm_app_regdb.c. |
wlan.ssid | SSID of the AP to connect to. |
wlan.password | The Wi-Fi password, not required if wlan.security is open. |
wlan.security | The Wi-Fi security to use, valid values are sae, owe and open. |
ping.target | IP address of the remote device (e.g., AP) to ping. |
ping.count | Number of ping packets to send. |
ping.size | Size of ping payload in bytes. |
ping.interval | Interval (in ms) between successive ping requests. |
bcf_file | Board configuration .mbin file to use. |
The preferred method of configuring the application is using the Morse Micro Persistent Configuration Store module. The main advantage here is that we only have to build the binary once to get a variety of different combinations. An example might be that you would like to ping a different remote IP, you can just modify the value in the Morse Micro Persistent Configuration Store and reboot the application (by pressing the reset button).
The values stored in the Morse Micro Persistent Configuration Store module will take preference over any configuration parameters set using the legacy method.
Instructions for loading values into Morse Micro Persistent Configuration Store can be found in Setting Application Configuration.
The legacy method to configure the application is to use a #define for each parameter. These will be ignored if the corresponding Morse Micro Persistent Configuration Store parameter is set.
The location of the defines are in two places.
mm-iot-sdk-<VER>/examples/ping/src/ping.c contains the defines specific to the ping application.
mm-iot-sdk-<VER>/examples/ping/src/mm_app_loadconfig.c contains the defines relating the wlan/network configuration.
We will be building for the
mm-ekh08-u575platform but the same steps apply for all platforms. Just run make from the corresponding directory.
To build the ping example application, first change into the example directory, mm-iot-sdk-<VER>/examples/ping/targets/mm-ekh08-u575 then invoke the following command:
make -j4
Where 4 specifies the number of parallel threads to run and can be substituted for a value appropriate to your platform.
The result of the above command will be a ping.elf file in the build/ directory for the ping example application.
As mentioned in the Unpacking the software package section, its is assumed that you will be running the following commands from the
mm-iot-sdk-<VER>/frameworkdirectory. You will need to open multiple terminal windows when going through the following steps. We recommend using some kind of tiling terminal emulator such as Tilix but this is not required.
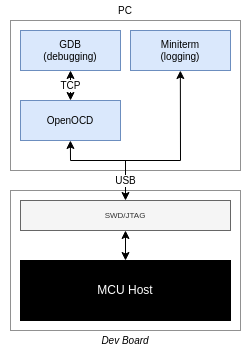
To program, configure, and monitor the system we will be using an ST-LINK debugger/programmer operating over USB. The ST-LINK provides both a debug interface and a USB serial port, the latter of which is used for log messages. The GNU Debugger (GDB) is used for debugging, with OpenOCD providing the interface between the GDB and the hardware, as shown in the diagram below. The ST-link is on board the Nucleo, or on the Morse Micro evaluation kit for standalone Platforms. See Morse Micro IoT Reference Platforms for which USB port to connect to.
Connect the ST-LINK to the development PC following the instructions on the Morse Micro IoT Reference Platforms page. To verify that it has enumerated, run lsub as follows:
lsusb | grep STM
This should result in output similar to the following:
Bus 003 Device 081: ID 0483:374e STMicroelectronics STLINK-V3
Miniterm is a python based console application that allows us to monitor and interact with a serial interface. There are many other options such as minicom or putty that you can use if you so wish. However, your milage may vary if you decided to use another application.
Open a new terminal and execute the following command to find the path to the ST-LINK serial port:
ls /dev/serial/by-id/usb-STMicroelectronics_*
This will list the ST-LINK serial port devices connected to the PC.
To start Miniterm, execute the following command, substituting XXX for the actual value from the output of the ls command above:
miniterm /dev/serial/by-id/usb-STMicroelectronics_XXX 115200
Leave Miniterm running, this is where we will view the output from the application after programing the device.
Open On-Chip Debugger (OpenOCD) is an open-source application that provides debugging, in-system programming and boundary-scan testing for embedded target devices. We will be using it to configure and program the host processor.
First of all, follow the instructions in Development PC setup to ensure that the correct OpenOCD bin directory is in your path.
To verify that the correct OpenOCD is in the path, execute the following command:
which openocd
If you have followed the instructions in Development PC setup then the result of this command should be as follows:
/opt/morse/xpack-openocd-0.12.0-2/bin/openocd
To launch OpenOCD, first open a new terminal and change into the IoT SDK (framework) directory. Execute:
openocd -f src/platforms/mm-ekh08-u575/openocd.cfg
Leave OpenOCD running as we will be using it in the following steps.
Note that the
openocd.cfgwill vary for each platform.
First, follow the instructions in Development PC setup to ensure that Pipenv virtualenv is created.
As mentioned in the Application Configuration section, each application has a number of configuration variables that modify the behavior of the application.
Most config store fields have default values specified, but there are two important fields that must be specified explicitly. The wlan.country_code field must be set to the 2 letter code for your applicable regulatory domain, and the bcf_file field must specify the path to the appropriate Board Configuration File. Refer to the config.hjson file in the example application directory for details specific to each application.
The Board Configuration File (BCF) is a configuration file for the Morse Micro chip that provides board-specific information and is required for the system to function properly. BCFs for Morse Micro modules are included in the MM-IoT-SDK package. These modules can be identified by the part numbers printed on their labels, which take the form MM6108-MFxxxxxx.
.mbin (Morse binary) format. This differs from the format used for the Linux driver so you cannot use those BCFs here.All configuration values are stored as key-value pairs in the Morse Micro Persistent Configuration Store section of the MCU flash. To simplify programming of these values we provide a python script that allows you to write, read and delete values. To see a full list of capabilities the following command can be run to see a help menu:
pipenv run ./tools/platform/program-configstore.py -h
For this example we are going to write the values using the config.hjson file provided with the ping example application. You will need to remove the leading // from in front of the wlan.country_code and bcf_file values. Replacing them with appropriate values for you country and device.
Once those values have been updated you can run the following command to load the values onto the device.
pipenv run ./tools/platform/program-configstore.py -H localhost write-json ../examples/ping/config.hjson
To confirm that the correct values have been loaded the following command can be run to dump the contents of the Morse Micro Persistent Configuration Store section.
pipenv run ./tools/platform/program-configstore.py -H localhost -d
The expected output (note the exact contents will vary slightly depending on BCF and country).
2023-10-23 16:06:13 WARNING: Failed to read config store partition 1 at 0x08006000: Invalid signature found

Partition 0 (current)
=====================

  Version 1

  Key                              | Value
  ---------------------------------|--------
  wlan.ssid                        | MorseMicro
  wlan.password                    | 12345678
  wlan.security                    | sae
  wlan.country_code                | AU
  ip.dhcp_enabled                  | false
  ip.ip_addr                       | 192.168.1.2
  ip.netmask                       | 255.255.255.0
  ip.gateway                       | 192.168.1.1
  ip6.autoconfig                   | true
  ping.target                      | 192.168.1.1
  ping.count                       | 10
  ping.interval                    | 1000
  ping.size                        | 56
  bcf_file                         | 008004004d4d424300812801efbeadde7e66a50e04000200180100000000 ...
The above process should only need to be performed once, since the sectors used by Morse Micro Persistent Configuration Store should not be affected by normal application programming. Note, that these values may need to be updated if you update the version of the Morse Micro IoT SDK used. The most likely value that will need to be updated is the bcf_file.
This is not relevant for other platforms
The mm-ekh08-wb55 Platform is slightly more complex in that it has a main CPU (M4) as well as a second CPU (M0+) that is used for its RF functionality. The chip will reserve a portion of the flash for exclusive use by CPU2. This means that the position of the last sector (available to CPU1) may change.
By default it is assumed that CPU2 will not be used and any FW will be deleted, moving the last available flash sector to offset 0xF3. To ensure this is the case you will need to use the STM32CubeProgrammer to delete any CPU2 firmware that may have been loaded onto the device. The following steps will assume you have the mm-ekh08-wb55 Platform connected to the same machine and OpenOCD is not running so as not to conflict with the st-link access.
Navigate into the STM32CubeProgrammer/bin directory and run the following:
./STM32_Programmer_CLI -c port=swd -startfus
./STM32_Programmer_CLI -c port=swd -fwdelete
If all the operations were successful the value of the SFSA register (which defines the start of the flash address space that is protected for CPU2 use) should now be 0xF4. This can be checked by running:
./STM32_Programmer_CLI -c port=swd -ob displ
The GNU Project debugger (GDB) is an application allows us to program and debug an application. We will just be using it to program and run the application.
First of all, follow the instructions in Development PC setup to ensure that the correct ARM toolchain bin directory is in your path.
To verify that the correct ARM toolchain is in the path, execute the following command:
which arm-none-eabi-gdb
If you have followed the instructions in Development PC setup then the result of this command should be as follows:
/opt/morse/gcc-arm-none-eabi-10.3-2021.07/bin/arm-none-eabi-gdb
Once OpenOCD and Miniterm are running, as described in the previous sections, it is possible to then launch GDB to program the device.
Ensure you are in the same directory where the make command was run to build the application (see Building Firmware – for example, mm-iot-sdk-<VER>/examples/<example_name>/targets/<target_name>) and invoke:
arm-none-eabi-gdb build/ping.elf -ex 'target extended-remote :3333'
This will start GDB and connect to the local OpenOCD instance started above.
From the GDB terminal first reset and halt the device by executing:
monitor reset halt
Then download firmware by executing:
load
Once the firmware download has completed, the processor can be started by executing:
continue
As the firmware runs, it will boot the Morse Micro transceiver and attempt to connect to the AP and ping it. A successful result will output something like the following in Miniterm:
Note: This firmware has been built with debug in stop mode enabled. This will impact power consumption and should be disabled for production firmware.
Morse Ping Demo (Built Oct 10 2024 09:36:50)

-----------------------------------
BCF API version:         6.7.0
BCF build version:       4cdf808 07f9d31
BCF board description:   MM_LP3
Morselib version:        2.6.1
Morse firmware version:  1.13.1
Morse chip ID:           0x0306
Morse chip name:         MM6108A1
-----------------------------------
Initialize IPv4 with static IP: 192.168.1.2...
Initialize IPv6 using Autoconfig...
Morse LwIP interface initialised. MAC address 0c:bf:74:00:01:2b
Attempting to connect to MorseMicro with passphrase 12345678
This may take some time (~30 seconds)
WLAN STA connecting
WLAN STA connected
Link is up. Time: 8294 ms, IP: 192.168.1.2, Netmask: 255.255.255.0, Gateway: 192.168.1.1

Ping 192.168.1.1 56(64) bytes of data.
(192.168.1.1) packets transmitted/received = 1/1, round-trip min/avg/max = 34/34/34 ms
(192.168.1.1) packets transmitted/received = 2/2, round-trip min/avg/max = 4/19/34 ms
(192.168.1.1) packets transmitted/received = 3/2, round-trip min/avg/max = 4/19/34 ms
(192.168.1.1) packets transmitted/received = 3/3, round-trip min/avg/max = 4/17/34 ms
(192.168.1.1) packets transmitted/received = 4/3, round-trip min/avg/max = 4/17/34 ms
(192.168.1.1) packets transmitted/received = 4/4, round-trip min/avg/max = 4/15/34 ms
(192.168.1.1) packets transmitted/received = 5/5, round-trip min/avg/max = 1/12/34 ms
(192.168.1.1) packets transmitted/received = 6/6, round-trip min/avg/max = 1/11/34 ms
(192.168.1.1) packets transmitted/received = 7/6, round-trip min/avg/max = 1/11/34 ms
(192.168.1.1) packets transmitted/received = 7/7, round-trip min/avg/max = 1/11/34 ms
(192.168.1.1) packets transmitted/received = 8/7, round-trip min/avg/max = 1/11/34 ms
(192.168.1.1) packets transmitted/received = 8/8, round-trip min/avg/max = 1/11/34 ms
(192.168.1.1) packets transmitted/received = 9/8, round-trip min/avg/max = 1/11/34 ms
(192.168.1.1) packets transmitted/received = 9/9, round-trip min/avg/max = 1/11/34 ms
(192.168.1.1) packets transmitted/received = 10/9, round-trip min/avg/max = 1/11/34 ms
(192.168.1.1) packets transmitted/received = 10/10, round-trip min/avg/max = 1/12/34 ms

--- 192.168.1.1 ping statistics ---
10 packets transmitted, 10 packets received, 0.000% packet loss
round-trip min/avg/max = 1/12/34 ms
WLAN STA disabled
Link is down. Time: 28727 ms
To halt the firmware press CTRL-C and to exit GDB from there press CTRL-D and enter y when prompted.
From here you can try out the other Example Applications.
The following message in the console log...
Unable to find BCF file entry in config store (memory range 0x81e0000-0x8200000)
Please see the Getting Started Guide for more information.
The above message will be displayed if a Morse Micro Board Configuration File (BCF file) file has not been programmed to the config store. See Setting Application Configuration for steps on how to do this.
You are unable to connect to the MCU when you run the 'openocd -f openocd.cfg' commands.
This may look like one of the following
% openocd -f openocd.cfg
xPack OpenOCD x86_64 Open On-Chip Debugger 0.12.0+dev-01312-g18281b0c4-dirty (2023-09-04-22:31)
Licensed under GNU GPL v2
For bug reports, read
    http://openocd.org/doc/doxygen/bugs.html
Info : The selected transport took over low-level target control. The results might differ compared to plain JTAG/SWD
Info : DEPRECATED target event trace-config; use TPIU events {pre,post}-{enable,disable}
Info : Listening on port 6666 for tcl connections
Info : Listening on port 4444 for telnet connections
Info : clock speed 500 kHz
Info : STLINK V3J8M3 (API v3) VID:PID 0483:374E
Info : Target voltage: 0.003198
Error: target voltage may be too low for reliable debugging
Error: init mode failed (unable to connect to the target)


% openocd -f openocd.cfg
xPack OpenOCD x86_64 Open On-Chip Debugger 0.12.0+dev-01312-g18281b0c4-dirty (2023-09-04-22:31)
Licensed under GNU GPL v2
For bug reports, read
    http://openocd.org/doc/doxygen/bugs.html
Info : The selected transport took over low-level target control. The results might differ compared to plain JTAG/SWD
Info : DEPRECATED target event trace-config; use TPIU events {pre,post}-{enable,disable}
Info : Listening on port 6666 for tcl connections
Info : Listening on port 4444 for telnet connections
Info : clock speed 500 kHz
Info : STLINK V3J8M3 (API v3) VID:PID 0483:374E
Info : Target voltage: 3.303398
Error: init mode failed (unable to connect to the target)
The voltage (VDD) or current measurement (IDD) jumpers are not attached on your development board.
For the ST Nucleo U575 development board VDD is JP4 and IDD is JP5. See Morse Micro IoT Reference Platforms for details of your specific platform.
The ST-Link debugger is unable to communicate with the host processor because it is in deep sleep. It may be necessary to hold the chip in reset while attaching to it. This can be achieved by adding -c "set CONNECT_ASSERT_SRST 1" to the OpenOCD command line before including openocd.cfg. For example:
% openocd -c "set CONNECT_ASSERT_SRST 1" -f openocd.cfg
See Debugging during deep sleep for more information.