Morse Micro IoT SDK  2.9.7
aws_iot.c File Reference

Detailed Description

AWS IoT example to demonstrate connecting to AWS Shadow service and demonstrate a simple light bulb example.

Note
It is assumed that you have followed the steps in the Getting Started guide and are therefore familiar with how to build, flash, and monitor an application using the MM-IoT-SDK framework.

This example application demonstrates how to use AWS IoT Core services to connect to an AWS endpoint and use the shadow service to mirror the state of a light bulb shadow state maintained by AWS.

Getting Started

The following steps need to be done to run this application:

Sign in to the AWS IoT console

  • Go to https://aws.amazon.com/ and click Sign in on the top right corner. If you don't already have an Amazon/AWS account, create one or contact your company IT department to create a company account for you.
  • From the services menu on the top left select Internet of Things > IoT Core

Create a Thing

  • On the left hand menu select Manage > All Devices > Things
  • Click Create things
  • Select Create single thing
  • Click Next
  • Enter a Thing name. You will need to remember this for name later.
  • Select Unnamed shadow (classic)
  • Enter the following as shadow statement:
    {
    "state": {
    "reported": {
    "powerOn": 0
    },
    "desired": {
    "powerOn": 0
    }
    }
    }
  • Click Next
  • Select Auto generate new certificates
  • Click Next.
  • Now create an "Allow All" policy if you do not already have one (you only need to do this once).
    • Click Create Policy (this will open a new tab)
    • Enter a policy name such as AllowAll
    • In the Builder tab, in Policy document enter the following data:
      Policy effect: Allow
      Policy action: *
      Policy resource: *
    • Click Create.
    • Return to the Attach policies to certificate tab in your browser
  • Ensure the AllowAll policy is selected
  • Click Create thing

Congratulations! Your device should now be created.

Download the certificates and key files and proceed to the next step. Specifically you will need the Device Certificate, Device Private Key amd the Amazon RSA Root Certificate.

Note
You can also create the Allow All policy on the AWS CLI using the following command:
aws iot create-policy \
--policy-name="AllowAllDev" \
--policy-document="{ \"Version\": \"1\", \
\"Statement\": [{ \
\"Effect\": \"Allow\", \
\"Action\": \"iot:*\", \
\"Resource\": \"*\" \
}]}"
Likewise, you can create all certificates in the AWS CLI. You may also use third party tools like openssh to create the device certificate and keys and upload them using AWS CLI.
We show creating certificates for a single thing using the AWS IoT console as this is the easiest way to test the application. This is however not a practical way to provision devices in the field. For production we recommend Just In Time Provisioning as documented here https://docs.aws.amazon.com/iot/latest/developerguide/jit-provisioning.html This method loads all devices with a common provisioning certificate, which then gets replaced with a unique device certificate when the device first connects to the AWS endpoint.

Install device certificates and keys

  • In the credentials directory replace the files AmazonRootCA.pem, certificate.pem.crt, and private.pem.key with the files downloaded from AWS in the previous step. Rename the downloaded files to match the target file names. Note: Amazon provides you with 2 root CA files to download, please use the file named AmazonRootCA1.pem.
  • Open the config.hjson file.
    • Update the value of aws.thingname with the name of the thing you created in the previous section.
    • Now, in AWS IoT console, navigate to Manage > All Devices > Things
      • Click on the thing you just created and then click on the "Device Shadows" tab.
      • Click on the "Classic Shadow". Then look at the "Device Shadow URL" in the "Device Shadow details" panel.
      • Update the value of aws.endpoint with the server name in the URL. Ensure you remove the https:// and everything after amazonaws.com
        • Alternatively, you can get the endpoint from the AWS CLI by typing in the following command:
          aws iot describe-endpoint
  • Follow the Programming the config store from a host PC instructions to load the config.hjson file to the device.
    Note
    The default config store key names are defined in aws_iot_config.h. You may change these names as required for your application.

Running the application

  • Now build and run the application.
  • You should see the device connect to AWS IoT.
    • If you see connection failures ensure your access point forwards traffic to the Internet.
  • Once the device is connected look for the state of the powerOn variable.
    • Initially it should be 0 signifying the lamp is OFF - in the ST Nucleo boards this is represented by the Blue LED which should be OFF.
  • Now Open the AWS IoT console and click on the "MQTT Test client" from the left hand side menu.
    • Click on "Publish to a Topic" tab and enter the following topic:
      $aws/things/<your_thing_name>/shadow/update
      Naturally, replace "<your_thing_name>" with the name of the thing you created.
    • Enter the following JSON text in the "Message payload" section and click "Publish".
      {
      "state": {
      "desired": {
      "powerOn": 1
      }
      }
      }
  • You should now see the LED turn ON and the value of powerOn parameter printed on the console output should change.

What is AWS Shadow?

AWS Shadow service allows us to cache the state of an IoT device on the cloud. This allows the IoT device to go to sleep and wake up once in a while to update its state on the cloud and act on pending state change requests on the cloud. For example a temperature sensor could periodically measure and update the temperature using the AWS Shadow service and go to sleep for minutes or even hours at a time while AWS Shadow caches this data and makes it available persistently to anyone who may be interested in the temperature even though the sensor is asleep and no longer reachable on the network.

Likewise, for a light bulb, AWS Shadow remembers the state of the light bulb even though the light bulb itself may have been unplugged and so not connected to the network. In fact the AWS Shadow can accept state change requests on behalf of the light bulb when it is unplugged and then convey the desired state to the light bulb when it connects again.

This is how it works:

  • A device such as a light switch that desires to change the state of the light bulb publishes a message to the topic "$aws/things/<your_thing_name>/shadow/update"
    {
    "state": {
    "desired": {
    "powerOn": 1
    }
    }
    }
  • If this is a change in state, then AWS Shadow will post a delta message to "$aws/things/<your_thing_name>/shadow/update/delta" as
    {
    "state": {
    "powerOn": 1
    }
    }
    • If the device is unplugged, then AWS Shadow will automatically send this message with the latest state when the device comes online next.
  • Once the device receives this delta message and acts on it, it will then report its new state by publishing to: "$aws/things/<your_thing_name>/shadow/update"
    {
    "state": {
    "reported": {
    "powerOn": 1
    }
    }
    }
  • If the state change was accepted, AWS Shadow will forward the above message to: "$aws/things/<your_thing_name>/shadow/update/accepted"
  • If for some reason, the state change request was rejected by the device, then AWS Shadow will publish to "$aws/things/<your_thing_name>/shadow/update/rejected"

For more information see: https://docs.aws.amazon.com/iot/latest/developerguide/iot-device-shadows.html

Integrating with Alexa

Now that we have seen AWS Shadow being used to connect to and control our IoT device, how can we put this to practice with a real world application?

Amazon shows us how we can use Alexa to post messages to AWS IoT devices with an example smart hotel application: https://aws.amazon.com/blogs/iot/implement-a-connected-building-with-alexa-and-aws-iot/

In this example they show us how to create an Alexa skill that can post JSON messages to our IoT device using AWS Shadow. You can use the tutorial above to customize this application for your specific smart device needs.

Automation and Production

In the example above we used the AWS IoT console to create certificates and publish/subscribe to MQTT messages. While this may be convenient for development and testing, it is hardly a practical approach for real world applications. Luckily, we have options - Amazon provides us with the AWS CLI (Command Line Interface), which lets us do everything above using a command line interface such as creating certificates, registering devices, publishing and subscribing to MQTT messages. This allows us to automate and script production and registration of devices and even implement M2M communications using the MQTT publish/subscribe API. A full reference of the available commands is at: https://docs.aws.amazon.com/cli/latest/index.html

OTA Updates

This application supports Over The Air updates. OTA updates can be used to update the existing application on the IoT device with newer versions of itself. For OTA updates to work, there must be a bootloader installed and an existing version of the application that is able to connect to the AWS IoT infrastructure.

Note
OTA updates are disabled by default, to enable set the build define ENABLE_OTA_APP to 1.

To perform an OTA update, first ensure there is a version of this application running on the device with the right credentials and certificates to connect to the service. In addition to certificates and keys described in step 3 of the Getting Started section above, we will also need a code signing certificate to be installed on the device. This certificate can be generated using a tool like openssl as described below:

Note
OTA update feature is supported only on mm-ekh08-u575 and mm-mm6108-ekh05 platforms - you will get an error on all other platforms if you attempt an OTA update. To add OTA support to your platform, you will need to:
  • Build and install the bootloader for your platform. (See bootloader.c) If you are loading the application using openocd, then first load the application and then load the bootloader. Do this every time you load the application using openocd as the application contains a stub bootloader that will overwrite the real bootloader.
  • Ensure you have enabled flash file-system support for your platform. To add flash file-system support for your platform, you will need to add a .filesystem section to your linker definition file that is big enough to accommodate the OTA download image plus any other data you may store in the file-system. Also ensure you have a valid implementation of mmhal_get_littlefs_config() that returns your file-system configuration.

Generating Code Signing Keys

Option 1: Generating @c ECDSA Keys for signing by AWS

The steps below are from the following document: https://docs.aws.amazon.com/freertos/latest/userguide/ota-code-sign-cert-win.html

  • In your working directory, create a file named cert_config.txt with the following text:
    [ req ]
    prompt = no
    distinguished_name = my_dn
    [ my_dn ]
    commonName = me@myemail.com
    [ my_exts ]
    keyUsage = digitalSignature
    extendedKeyUsage = codeSigning
    Replace me@my.nosp@m.emai.nosp@m.l.com with your organization email and replace the my in my_dn and my_exts with your organization name as appropriate.
  • Create an ECDSA code-signing private key:
    openssl genpkey -algorithm EC -pkeyopt ec_paramgen_curve:P-256 -pkeyopt ec_param_enc:named_curve -outform PEM -out otasigning.key
  • Create an ECDSA code-signing certificate:
    openssl req -new -x509 -config cert_config.txt -extensions my_exts -nodes -days 365 -key otasigning.key -out otasigning.pem.crt
  • Copy the otasigning.pem.crt file to the credentials folder and follow the Programming the config store from a host PC instructions to load the config.hjson file to the device. Ensure you have generated the other certificates, keys and provisioning information as described in Getting Started section above.

Option 2: Generating Self signing (RSA) keys

  • Create the signing keys & certificate as shown below:
    openssl genrsa -out otasigning.key 2048
    openssl rsa -in otasigning.key -pubout otasigning.pem.crt
  • Copy the otasigning.pem.crt file to the credentials folder and follow the Programming the config store from a host PC instructions to load the config.hjson file to the device. Ensure you have generated the other certificates, keys and provisioning information as described in Getting Started section above.
  • Sign the code
    • Build the update file for the application, you should get a .mbin file in the output directory
      make mbin -j4
    • Sign the .mbin file as shown below
      openssl dgst -sha256 -sign otasigning.key -out signature.bin <MBIN file>
      openssl enc -base64 -in signature.bin -out signature.txt
  • Upload the MBIN file to AWS as described below, paste the contents of the signature.txt file into the signature field

Deploying the update

  • First, ensure your AWS account has the required permissions. For more information, see: https://docs.aws.amazon.com/freertos/latest/userguide/code-sign-policy.html
  • In the AWS IoT Core portal, select Manage > Remote Actions > Jobs, then click Create job.
  • Under Job type select Create FreeRTOS OTA update job, then choose Next.
  • Enter a name for the job and click Next.
  • Under Devices to update, choose one or more things or thing groups from the drop down menu.
  • Select MQTT for file transfer protocol.
  • Under Sign and choose your file, select Sign a new file for me.
  • If you are using Option 2 (Self signed image), then select Use My custom signed file
    • Cut and paste the contents of the signature.txt file that you generated while signing into the signature box.
    • Select SHA-256 as the original hash algorithm.
    • Select RSA as the original encryption algorithm.
    • Enter aws.ota_cert as the path name of the code signing certificate on the device. (This incidentally is the name of the config store key that contains the certificate)
    • Click Upload a new file and upload the .mbin file.
    • If you have not already done so, create an S3 bucket and specify the path to save the file as.
    • In path name of the file on the device enter the name of the mbin file. Ensure this is a valid file name or the update will fail.
    • Select an IAM role with permissions to do OTA updates and click Next.
    • In the next screen click Create Job.
  • If you are using Option 1 (Signing by AWS)
    • If you have not already done so, under Code signing profile, choose Create new profile.
      • In Create a code signing profile, enter a name for your code-signing profile.
      • Under Device hardware platform choose Windows Simulator. You will need to get your platform certified by AWS for it to appear here.
      • Select Import a new code signing certificate.
      • Upload otasigning.pem.crt as the certificate body.
      • Upload otasigning.key as the certificate private key.
      • Click import.
      • Enter aws.ota_cert as the path name of the code signing certificate on the device.
      • Click Create.
    • Back at the previous screen, select the code signing profile you just created.
    • Click Upload a new file and upload the .mbin file.
    • If you have not already done so, create an S3 bucket and specify the path to save the file as.
    • In path name of the file on the device enter the name of the mbin file. Ensure this is a valid file name or the update will fail.
    • Select an IAM role with permissions to do OTA updates and click Next.
    • In the next screen click Create Job.

Congratulations! The update has been deployed. If the application is currently running on the device, it should immediately see the update and start downloading it. In a minute or two the device should reboot and the new update will be applied. AWS will indicate successful update on the console once the updated firmware boots and connects to AWS.

Note
OTA update performance will depend on the configuration in ota_config.h and modifying this configuration may decrease update time. See ota_config.h for more information on each option and what they are used for.
If the above process does not work for you, then you can debug the issue by enabling OTA logging by removing the DISABLE_OTA_LOGGING flag from the Makefile and platformio.ini files for this example. Also, ensure you increment the version numbers in version.h prior to every OTA update or you will get warnings that the new version is not higher than the old version, the update will still complete though.

For more information, see: https://docs.aws.amazon.com/freertos/latest/userguide/ota-console-workflow.html

Fleet Provisioning

The steps above describe how to provision one device at a time for AWS IoT. This however is not practical when we have to provision thousands of devices in the field. Thankfully AWS provides a mechanism called Fleet Provisioning that allows us to automate this process.

For more information on Fleet Provisioning see: https://docs.aws.amazon.com/whitepapers/latest/device-manufacturing-provisioning/provisioning-identity-in-aws-iot-core-for-device-connections.html

There are multiple mechanisms of implementing Fleet Provisioning - we have implemented the Fleet Provisioning by claim mechanism. In this mechanism a batch of devices (say 1000) will be loaded with a shared claim certificate and keys. The device will make first contact with the AWS endpoint using this shared certificate and key just as it would with regular device certificates and keys. The device then generates a new set of keys and sends the certificate to AWS for signing. AWS signs the certificate and assigns the device a new thing name based on the provisioning template - the provisioning template may specify the thing name is an amalgam of the device serial number (in our case the MAC address) and some prefix. The device saves the signed certificate, generated keys and thing name and uses them for all connections henceforth.

Use the steps below to implement fleet provisioning. Alternatively, if you prefer to use the AWS command line, then all the steps below are described here for the command line: https://www.freertos.org/iot-fleet-provisioning/demo.html#setting-up

Prerequisites

Ensure you have the required permissions and roles to implement fleet provisioning. Your AWS administrator can setup the roles using the following commands on the AWS command line:

  • Create FleetProvisioningRole role
    aws iam create-role --role-name "FleetProvisioningRole" --assume-role-policy-document \
    '{"Version":"2012-10-17","Statement":[{"Action":"sts:AssumeRole","Effect":"Allow", \
    "Principal":{"Service":"iot.amazonaws.com"}}]}'
  • Attach AWSIoTThingsRegistration policy to the role
    aws iam attach-role-policy --role-name "FleetProvisioningDemoRole" \
    --policy-arn arn:aws:iam::aws:policy/service-role/AWSIoTThingsRegistration
  • Create the AllowAll policy as described in Create a Thing

Create a thing type

  • Open the AWS IoT console web page.
  • Go to Manage > All Devices > Thing types
  • Click Create thing type
  • For this example, enter _fp_demo_things_ and click Create thing type
  • If you change the name remember to update it in the JSON file in the step below.

Create a claim policy

  • On the AWS IoT console go to Manage > Security > Policies
  • Click Create policy and give it a suitable name
  • In the Policy document section, click JSON and enter the code below (which can also be found in templates/fleet_provisioning_policy.json):
    {
    "Version": "2012-10-17",
    "Statement": [
    {
    "Effect": "Allow",
    "Action": [
    "iot:Connect"
    ],
    "Resource": "*"
    },
    {
    "Effect": "Allow",
    "Action": [
    "iot:Publish",
    "iot:Receive"
    ],
    "Resource": [
    "arn:aws:iot:<AWS-REGION>:<AWS-ACCOUNT-ID>:topic/$aws/certificates/create-from-csr/*",
    "arn:aws:iot:<AWS-REGION>:<AWS-ACCOUNT-ID>:topic/$aws/provisioning-templates/FleetProvisioningTemplate/provision/*"
    ]
    },
    {
    "Effect": "Allow",
    "Action": "iot:Subscribe",
    "Resource": [
    "arn:aws:iot:<AWS-REGION>:<AWS-ACCOUNT-ID>:topicfilter/$aws/certificates/create-from-csr/*",
    "arn:aws:iot:<AWS-REGION>:<AWS-ACCOUNT-ID>:topicfilter/$aws/provisioning-templates/FleetProvisioningTemplate/provision/*"
    ]
    }
    ]
    }
    Replace <aws-region> and <aws-account-id> as appropriate for your AWS account. Ensure you replace _FleetProvisioningTemplate_ with the name of the template you specified in Create provisioning template. Set the aws.provisioningtemplate key to the provisioning template name you specified here.

Create provisioning template

  • On the AWS IoT console go to Connect > Connect many devices > Connect many devices
  • Click Create provisioning template
  • Select Provisioning devices with claim certificate then click Next
  • Select Active, then enter a template name such as _FleetProvisioningTemplate_
  • Select the provisioning role you created in the prerequisites step above. Ensure _Attach managed policy to IAM role_ is unchecked.
  • Under Claim certificate policy select the claim certificate you created in above, Then click Next.
  • In the next page select Don't use a pre-provisioning action, then click Next.
  • In the next page click Next.
  • Finally click Create template
  • Then click on the newly created template, then click Edit JSON in the document section below. Enter the following JSON (which can also be found in templates/fleet_provisioning_template.json):
    {
    "Parameters": {
    "SerialNumber": {
    "Type": "String"
    },
    "AWS::IoT::Certificate::Id": {
    "Type": "String"
    }
    },
    "Resources": {
    "certificate": {
    "Properties": {
    "CertificateId": {
    "Ref": "AWS::IoT::Certificate::Id"
    },
    "Status": "Active"
    },
    "Type": "AWS::IoT::Certificate"
    },
    "policy": {
    "Properties": {
    "PolicyName": "AllowAll"
    },
    "Type": "AWS::IoT::Policy"
    },
    "thing": {
    "OverrideSettings": {
    "AttributePayload": "MERGE",
    "ThingGroups": "DO_NOTHING",
    "ThingTypeName": "REPLACE"
    },
    "Properties": {
    "AttributePayload": {},
    "ThingGroups": [],
    "ThingName": {
    "Fn::Join": [
    "",
    [
    "fp_demo_",
    {
    "Ref": "SerialNumber"
    }
    ]
    ]
    },
    "ThingTypeName": "fp_demo_things"
    },
    "Type": "AWS::IoT::Thing"
    }
    },
    "DeviceConfiguration": {
    "Foo": "Bar"
    }
    }
    Ensure _AllowAll_ matches the name of the AllowAll policy you created in the prerequisites. Ensure _fp_demo_things_ matches the thing type you created in Create a thing type
  • Click Save as new version

Generate claim certificates and keys

  • On the AWS IoT console go to Manage > Security > Certificates
  • Click Add Certificate > Create Certificate
  • On the next page download the private key, certificate and the root certificate.
  • Use this certificate and key as the claim certificate for a batch of devices. You may create multiple certificates here, one for each batch.
  • Select the certificate(s) you just created then click Attach policy and attach the claim policy you created earlier to all the claim certificates you generated now.

Setting up the device

  • Once the above steps are done, load the claim certificate, private key and root certificate as described in Install device certificates and keys. The device will use these credentials for the initial connection and will be replaced by device certificate and keys provided by AWS when provisioning has successfully completed.
  • Set the aws.provisioningtemplate key to the provisioning template name you set in Create provisioning template.
  • Ensure the device has the necessary Wi-Fi credentials and country code.
  • Power cycle the device, it should connect to AWS with the provided claim certificate. AWS will then sign the new certificate generated by the device and provide it with a Thing Name that the device will write to aws.thingname and atomically replace the claim credentials with the newly generated credentials.
  • After reboot the device will connect with the newly assigned credentials and commence normal operation.
Note
If you want to provision the same device a second time, remember to delete the device from Manage > All devices > Things. Also note that the device overwrites the claim certificate and keys, so there are several options should you require to re-provision (for example if adding factory reset support):
  • The application keeps a copy of the claim certificate and keys, then restores them on a factory reset and deletes the aws.thingname key. However, be aware that claim certificates are intended to be used temporarily and may expire or be revoked. So this method of re-provisioning may fail if the claim certificate is no longer valid.
  • The application uses the existing device certificates as claim certificates to re-provision, provided the device policy includes permissions for the create-from-csr and provisioning-templates resources. In our case the AllowAll policy allows everything including these claim permissions. To re-provision, the application simply deletes the aws.thingname key to trigger the provisioning process. This method has the advantage of requiring less resources by not needing to keep a copy of the claim certificate and key which saves around 3KB of storage in persistent store.

Definition in file aws_iot.c.

#include <string.h>
#include "mmhal.h"
#include "mmosal.h"
#include "mmconfig.h"
#include "mm_app_loadconfig.h"
#include "mmipal.h"
#include "mqtt_agent_task.h"
#include "sntp_client.h"
#include "core_json.h"
#include "mm_app_common.h"
#include "aws_iot_config.h"
Include dependency graph for aws_iot.c:

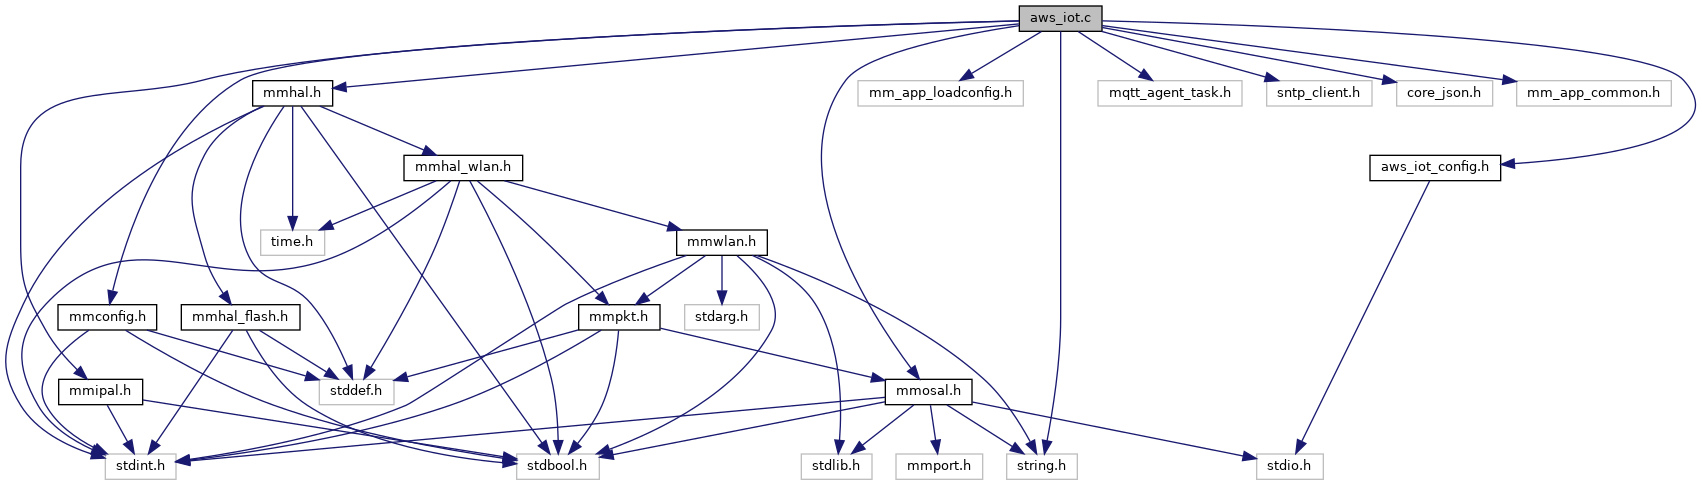
Go to the source code of this file.

Macros

#define NTP_MIN_TIMEOUT   3000
 Minimum NTP timeout per attempt. More...
 
#define NTP_MIN_BACKOFF   60000
 We need to back-off at least 60 seconds or most NTP Servers will tell us to go away. More...
 
#define NTP_MIN_BACKOFF_JITTER   3000
 Minimum back-off jitter per attempt. More...
 
#define NTP_MAX_BACKOFF_JITTER   60000
 Maximum back-off jitter per attempt. More...
 
#define SHADOW_PUBLISH_JSON
 Format string representing a Shadow document with a "reported" state. More...
 

Functions

void app_init (void)
 Main entry point to the application. More...
 

Macro Definition Documentation

◆ NTP_MAX_BACKOFF_JITTER

#define NTP_MAX_BACKOFF_JITTER   60000

Maximum back-off jitter per attempt.

Definition at line 532 of file aws_iot.c.

◆ NTP_MIN_BACKOFF

#define NTP_MIN_BACKOFF   60000

We need to back-off at least 60 seconds or most NTP Servers will tell us to go away.

Definition at line 528 of file aws_iot.c.

◆ NTP_MIN_BACKOFF_JITTER

#define NTP_MIN_BACKOFF_JITTER   3000

Minimum back-off jitter per attempt.

Definition at line 530 of file aws_iot.c.

◆ NTP_MIN_TIMEOUT

#define NTP_MIN_TIMEOUT   3000

Minimum NTP timeout per attempt.

Definition at line 526 of file aws_iot.c.

◆ SHADOW_PUBLISH_JSON

#define SHADOW_PUBLISH_JSON
Value:
"{" \
"\"state\":{" \
"\"reported\":{" \
"\"powerOn\":%lu" \
"}" \
"}," \
"\"clientToken\":\"%06lu\"" \
"}"

Format string representing a Shadow document with a "reported" state.

The real json document will look like this:

{
"state": {
"reported": {
"powerOn": 1
}
},
"clientToken": "021909"
}

Note the client token, which is optional. The token is used to identify the response to an update. The client token must be unique at any given time, but may be reused once the update is completed. For this demo, a timestamp is used for a client token.

Definition at line 553 of file aws_iot.c.

Function Documentation

◆ app_init()

void app_init ( void  )

Main entry point to the application.

This will be invoked in a thread once operating system and hardware initialization has completed. It may return, but it does not have to.

Definition at line 837 of file aws_iot.c.